HDFS: The Hadoop Distributed File System
HDFS is the storage foundation of the Hadoop ecosystem, designed to store massive datasets across large clusters of commodity hardware. It is the component that solves the challenge of storing data at a scale far beyond the capacity of a single machine.
What is HDFS?
HDFS is a Java-based, distributed file system that provides scalable and reliable data storage. It is the backbone for a wide variety of data processing applications coordinated by YARN. In production environments, HDFS has been proven to scale to hundreds of petabytes of storage across thousands of servers, supporting billions of files.
The core principle of HDFS is simple:
- Divide and Distribute: It breaks very large files into smaller, fixed-size blocks (typically 128 MB or 256 MB).
- Replicate for Reliability: It distributes these blocks across many machines in the cluster and creates multiple copies (replicas) of each block to ensure fault tolerance.

The Concept of Data Sharding
To understand why HDFS works the way it does, we must understand Data Sharding (or Horizontal Partitioning).
Vertical vs. Horizontal Partitioning
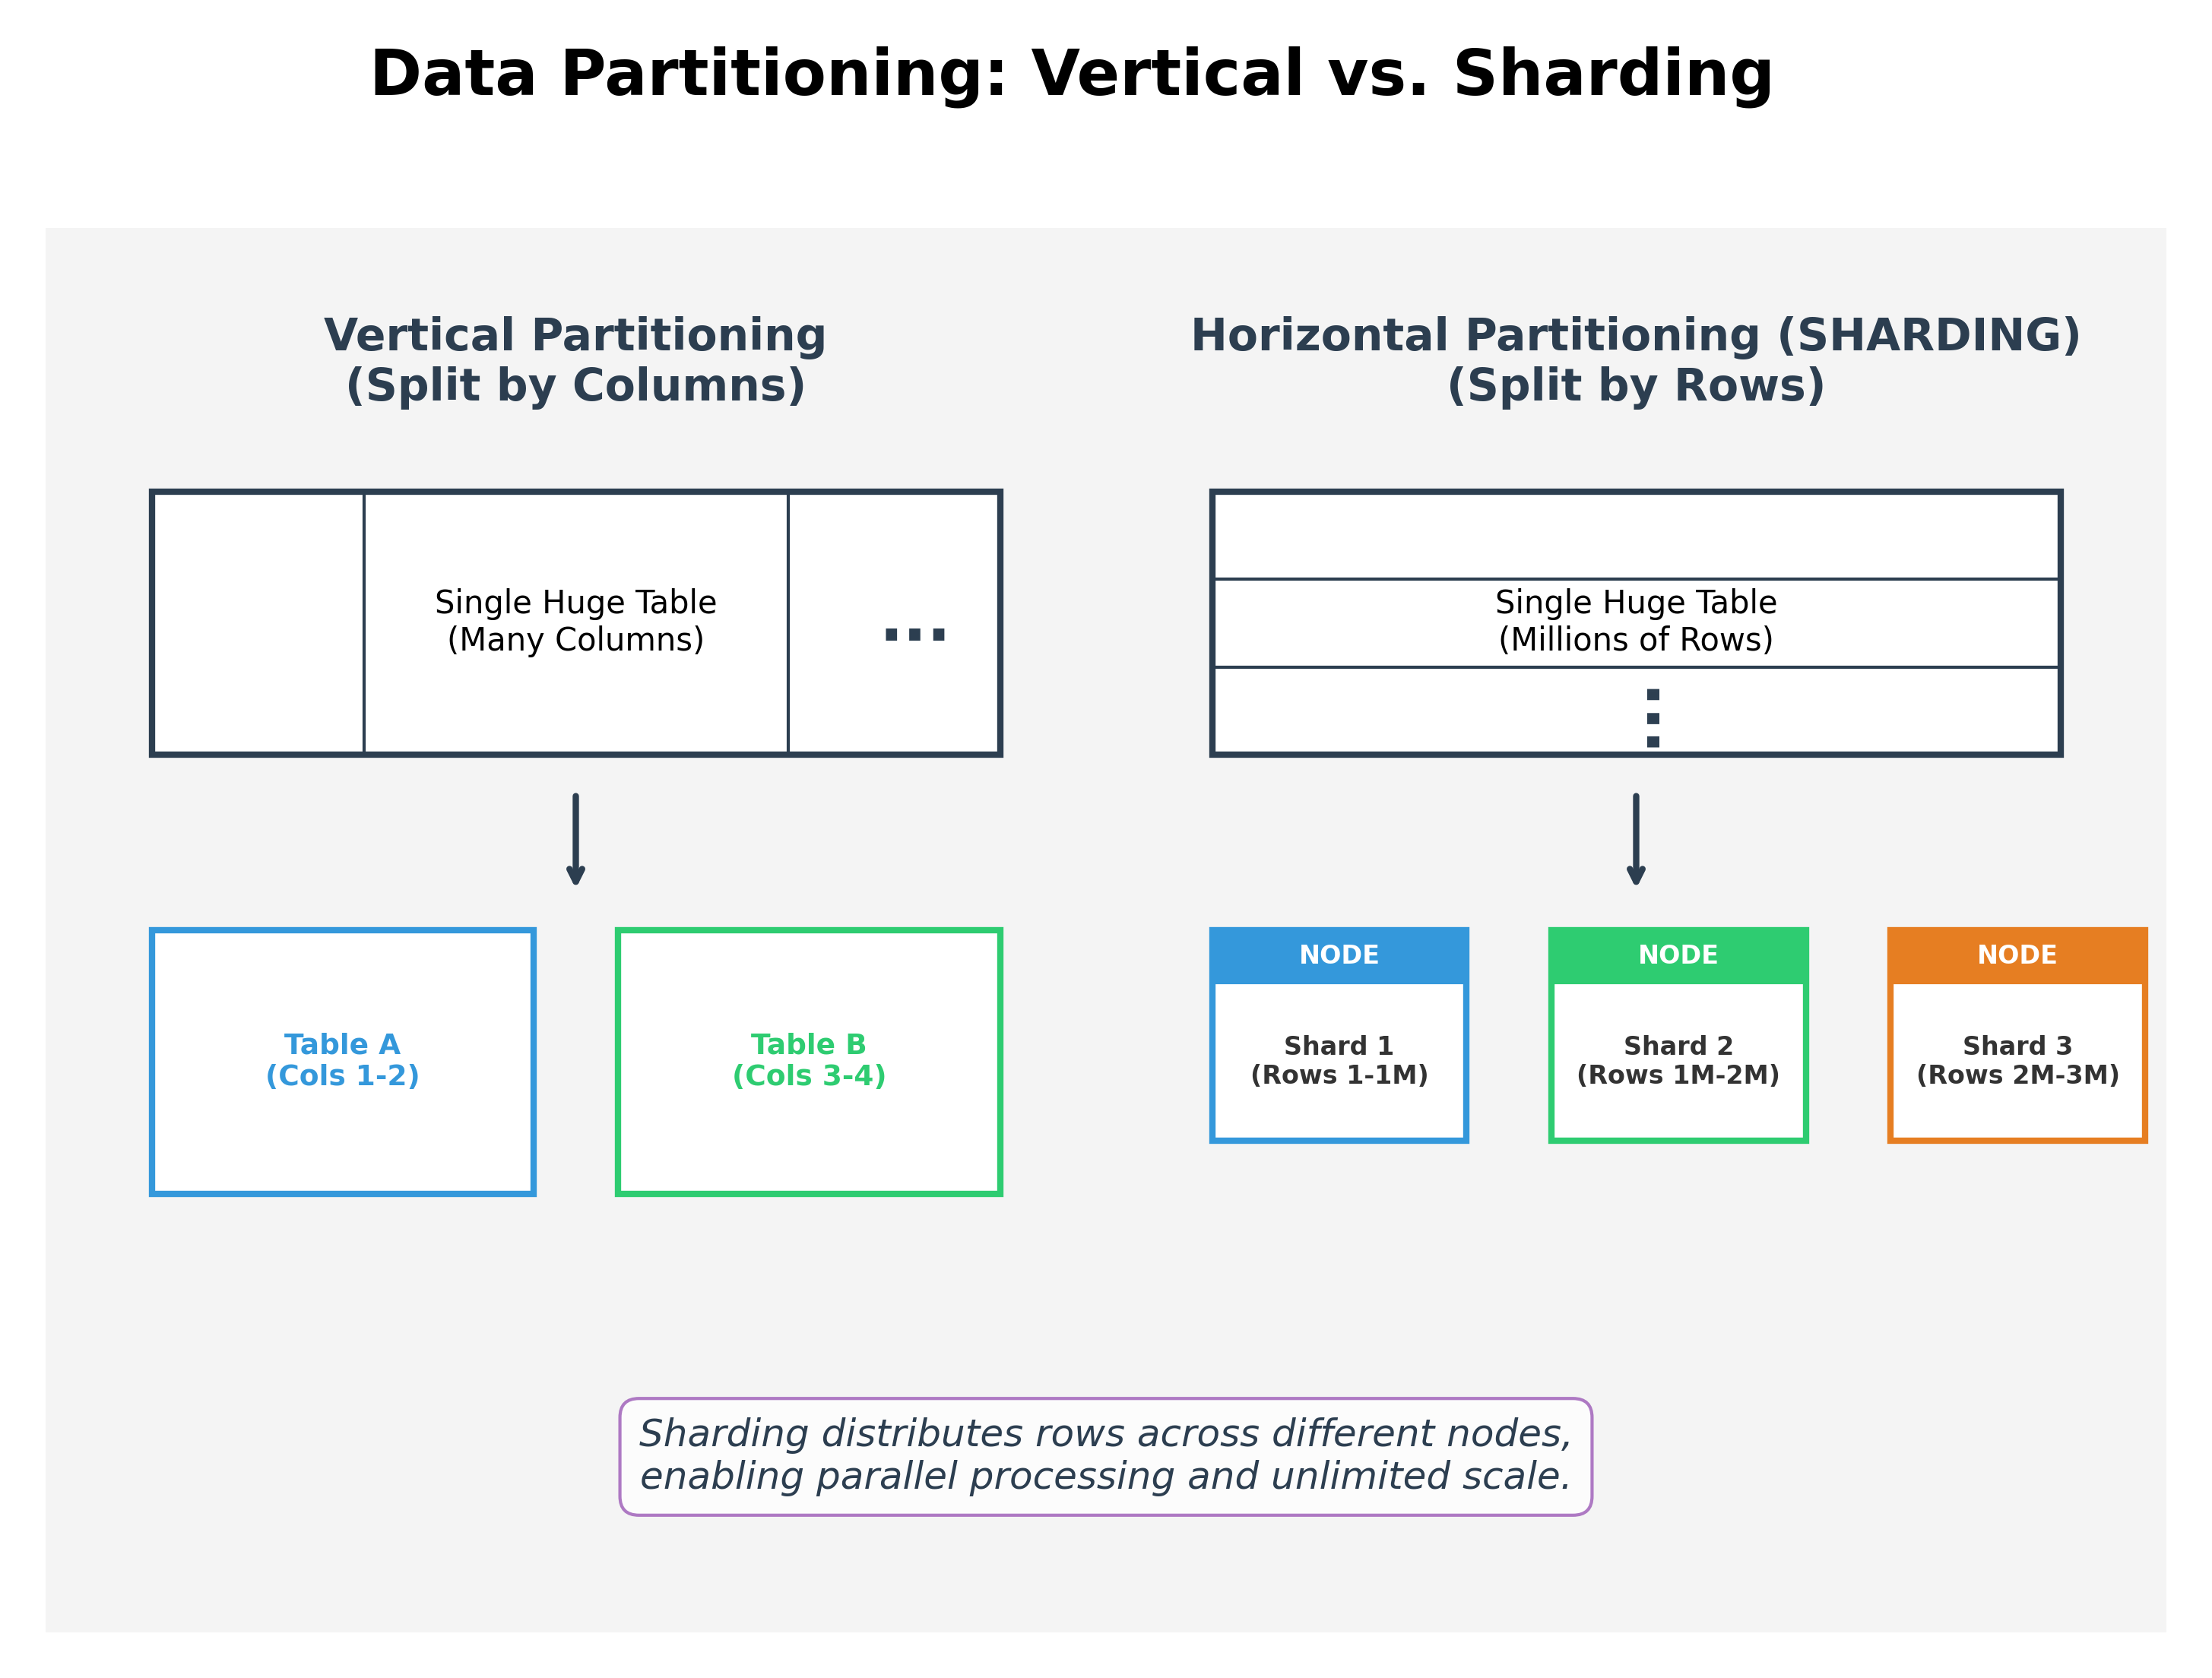
Vertical Partitioning
Vertical partitioning involves splitting a table by columns. For example, you might store a user's basic info in one table and their large profile pictures in another. This helps when you only need a subset of the data for most queries.
Horizontal Partitioning (Sharding)
Sharding involves splitting a dataset by rows. Instead of one massive table with 10 billion rows on a single server, you split it into 10 "shards," each containing 1 billion rows, and distribute them across 10 different servers.
Why Shard?
- Unlimited Scalability: Since data is distributed, you aren't limited by the storage capacity of a single machine.
- Parallel Processing: You can search all 10 shards simultaneously, making queries much faster.
- High Availability: If one shard goes down, the rest of the data remains accessible.
Real-World Examples of Sharding
| Type | Real-World Use Case | Technologies |
|---|---|---|
| Vertical Partitioning | Performance Optimization: Moving large "Blob" columns (like user bios or binary data) to a separate table so the "hot" data (username, email) can be queried faster. Security: Moving sensitive columns (SSN, Passwords) to a separate, highly-restricted table/shards. |
PostgreSQL, MySQL, HBase (Column Families), Cassandra. |
| Horizontal Sharding | Big Data Storage: Splitting a global user table across regions. Users in the US are stored on Shard A (US servers), while users in Europe are on Shard B (EU servers). Large Log Files: Splitting massive server logs by date or ID so they can be searched in parallel. |
HDFS (Blocks), MongoDB (Sharded Clusters), Google Spanner, Amazon DynamoDB. |
From Rows to Blocks: Sharding Files
While the term "sharding" is most commonly used when talking about database rows, the underlying principle is identical when applied to files in HDFS. If you think of a large file as a massive, continuous stream of data, HDFS "shards" this stream into manageable chunks.
In HDFS, these shards are called Blocks.
When you upload a 1 GB file to HDFS with a block size of 128 MB, HDFS performs "File Sharding":
- The Split: It partitions the file into 8 distinct blocks (shards).
- The Distribution: Instead of storing one 1GB file on one machine, it stores 8 smaller shards across the cluster.
- Parallelism: Just as a database can query multiple shards at once, a MapReduce or Spark job can process all 8 blocks of this file simultaneously on different nodes.
HDFS Architecture
HDFS uses a master/slave architecture composed of two key components:
- NameNode (Master): The NameNode is the brain of the file system. It maintains the directory tree and the metadata for all files and blocks. This metadata includes information like which blocks belong to a file and on which DataNodes those blocks are stored. The data itself never flows through the NameNode.
- DataNodes (Slaves): DataNodes are the workhorses. They store the actual data blocks on their local disks and are responsible for reading, writing, and replicating them as instructed by the NameNode.

How HDFS Handles Node Failures
HDFS is built for resilience and assumes that hardware failures are inevitable.
- Heartbeats: Each DataNode periodically sends a "heartbeat" signal to the NameNode (every 3 seconds by default). This signal informs the NameNode that the DataNode is alive and functioning correctly.
- Failure Detection: If the NameNode stops receiving heartbeats from a DataNode for a certain period (10 minutes by default), it marks the DataNode as "dead."
- Automatic Recovery: The NameNode then identifies all the data blocks that were stored on the dead node. It finds other live DataNodes that hold replicas of those blocks and instructs them to create new replicas on other healthy nodes, ensuring the replication factor (usually 3) is maintained.

The HDFS Read/Write Process
Writing a File:
- A client wanting to write a file contacts the NameNode.
- The NameNode provides the client with the addresses of a set of DataNodes for the first few blocks.
- The client writes the data directly to the first DataNode, which then forwards it to the second, and so on, creating a replication pipeline.
Reading a File:
- A client wanting to read a file contacts the NameNode.
- The NameNode returns a list of DataNode locations for each block in the file, prioritized by their proximity to the client.
- The client reads the blocks directly from the closest DataNodes. If a DataNode is unresponsive, the client simply tries the next DataNode in the list for that block.
This design makes HDFS ideal for WORM (Write Once, Read Many) workloads, which are common in big data analytics.
Key Improvements in Hadoop 3
Hadoop 3 introduced significant enhancements to HDFS:
- HDFS Erasure Coding (EC): As an alternative to replication, Erasure Coding provides the same level of fault tolerance with much less storage overhead. Instead of creating full copies, it uses parity blocks to reconstruct lost data. This can reduce storage overhead from 200% (with 3x replication) to as low as 50%, making it ideal for storing "cold" or infrequently accessed data.
- Multiple NameNodes: To eliminate the single point of failure of a single NameNode, Hadoop 3 allows for multiple standby NameNodes, improving high availability.
Interacting with HDFS
Users can interact with HDFS primarily through a command-line interface that mimics standard Linux file system commands. The standard command prefix is hdfs dfs.

Comprehensive HDFS Command List
| HDFS Command | Linux Equivalent | Description |
|---|---|---|
hdfs dfs -ls / |
ls / |
Lists the contents of an HDFS directory. |
hdfs dfs -mkdir -p /data/new |
mkdir -p /data/new |
Creates a directory, including parent directories. |
hdfs dfs -put local.csv /data |
cp local.csv /data |
Copies a file from the local file system to HDFS. |
hdfs dfs -get /data/file.txt . |
cp /data/file.txt . |
Copies a file from HDFS to the local file system. |
hdfs dfs -cp /src /dest |
cp /src /dest |
Copies a file or directory within HDFS. |
hdfs dfs -mv /src /dest |
mv /src /dest |
Moves a file or directory within HDFS. |
hdfs dfs -cat /data/file.csv |
cat /data/file.csv |
Displays the content of a file on standard output. |
hdfs dfs -head /data/file.txt |
head /data/file.txt |
Displays the first kilobyte of a file. |
hdfs dfs -tail /data/file.txt |
tail /data/file.txt |
Displays the last kilobyte of a file. |
hdfs dfs -rm /data/file.txt |
rm /data/file.txt |
Deletes a file. |
hdfs dfs -rm -r /data |
rm -r /data |
Deletes a directory and its contents recursively. |
hdfs dfs -chown user:group /dir |
chown user:group /dir |
Changes the owner and group of a file or directory. |
hdfs dfs -chmod 755 /dir |
chmod 755 /dir |
Changes the permissions of a file or directory. |
hdfs dfs -du -s -h /data |
du -sh /data |
Displays the aggregate size of files in a directory. |
hdfs dfs -df -h / |
df -h / |
Displays the free space on the HDFS file system. |
hdfs dfs -count /data |
N/A | Counts directories, files, and bytes under a path. |
For administrative tasks, such as generating reports on cluster health or managing snapshots, the hdfs dfsadmin command is used.
Common Linux Commands for Reference
This table lists some of the most frequently used commands in a standard Linux/Unix shell environment.
| Command | Description | Example |
|---|---|---|
ls |
Lists directory contents. | ls -l /home/user |
cd |
Changes the current directory. | cd /var/log |
pwd |
Prints the name of the current working directory. | pwd |
mkdir |
Creates a new directory. | mkdir my_project |
touch |
Creates an empty file or updates its timestamp. | touch new_file.txt |
rm |
Removes files or directories. | rm file.txt or rm -r old_project |
cp |
Copies files or directories. | cp source.txt destination.txt |
mv |
Moves or renames files or directories. | mv old_name.txt new_name.txt |
cat |
Concatenates and displays the content of files. | cat report.log |
more |
Displays file content one screen at a time. | more large_file.log |
less |
Displays file content with backward/forward movement. | less large_file.log |
head |
Outputs the first part of a file. | head -n 20 file.txt |
tail |
Outputs the last part of a file. | tail -f /var/log/syslog |
chmod |
Changes the access permissions of a file. | chmod 755 script.sh |
chown |
Changes the owner and group of a file. | chown user:group file.txt |
df |
Reports file system disk space usage. | df -h |
du |
Estimates file and directory space usage. | du -sh /home/user |
grep |
Searches for a pattern in text. | grep "error" app.log |
find |
Searches for files in a directory hierarchy. | find . -name "*.py" |
ps |
Reports a snapshot of the current processes. | ps aux or ps -ef |
kill |
Sends a signal to a process. Use kill -9 <PID> to force termination. The number 12345 is a placeholder; you would replace it with the actual Process ID (PID) found using a command like ps. |
ps aux | grep 'app_name' kill -9 12345 |
Understanding mkdir -p
The -p flag in the mkdir command stands for "parent". It's a powerful option that allows you to create a whole tree of directories with a single command, even if the parent directories don't exist yet.
mkdir new_dir: This will only succeed if the current directory exists.mkdir -p project/data/raw: This command will create therawdirectory, and ifprojectorproject/datado not already exist, it will create them as well. Without the-pflag, the command would fail unless theproject/datadirectory already existed.
This is extremely useful in scripting and data preparation workflows where you need to ensure a specific directory structure is in place before moving or creating files. The hdfs dfs -mkdir -p command works in exactly the same way for the HDFS file system.
Understanding ps aux vs. ps -ef
Both ps aux and ps -ef are used to view all running processes on a system, but they originate from different Unix traditions and display information in different formats.
ps aux(BSD Style):a: Show processes for all users.u: Display in a user-oriented format (shows the user who owns the process).x: Show processes not attached to any terminal (like daemons).- Output includes:
USER,%CPU,%MEM,VSZ,RSS, which are useful for seeing resource consumption at a glance.
ps -ef(System V Style):-e: Show every process.-f: Show in full format, which includes the parent process ID (PPID).- Output includes:
UID,PID,PPID,STIME, which are useful for tracing the process hierarchy (parent-child relationships) and seeing when a process started.
In practice, you can often use either, but you might choose one over the other depending on the information you need. For finding a specific process to kill, both work equally well with grep.
Understanding chmod and File Permissions
The chmod command is used to change the access permissions of files and directories. The permissions are represented by a three-digit octal number, where each digit corresponds to a specific set of users:
- First Digit: Represents the Owner (the user who created the file).
- Second Digit: Represents the Group (the group the file belongs to).
- Third Digit: Represents Others (all other users on the system).
Each digit is a sum of numbers representing three basic permissions:
- Read (r) = 4: Permission to view the contents of a file or list the contents of a directory.
- Write (w) = 2: Permission to modify or delete a file, or to create/delete files within a directory.
- Execute (x) = 1: Permission to run a file (if it's a script or program) or to enter a directory (
cd).
To set the permissions for a user type (Owner, Group, or Others), you add the numbers for the permissions you want to grant.
| Permission | Number | Description |
|---|---|---|
--- |
0 | No permissions. |
--x |
1 | Execute only. |
-w- |
2 | Write only. |
-wx |
3 | Write and execute (2 + 1). |
r-- |
4 | Read only. |
r-x |
5 | Read and execute (4 + 1). |
rw- |
6 | Read and write (4 + 2). |
rwx |
7 | Read, write, and execute (4 + 2 + 1). |
Example: chmod 755 script.sh
Let's break down the meaning of 755:
- 7 (Owner):
4 + 2 + 1->rwx. The owner can read, write, and execute the file. - 5 (Group):
4 + 0 + 1->r-x. Members of the group can read and execute the file, but cannot modify it. - 5 (Others):
4 + 0 + 1->r-x. All other users can also read and execute the file, but cannot modify it.
This is a very common permission setting for executable scripts and programs.